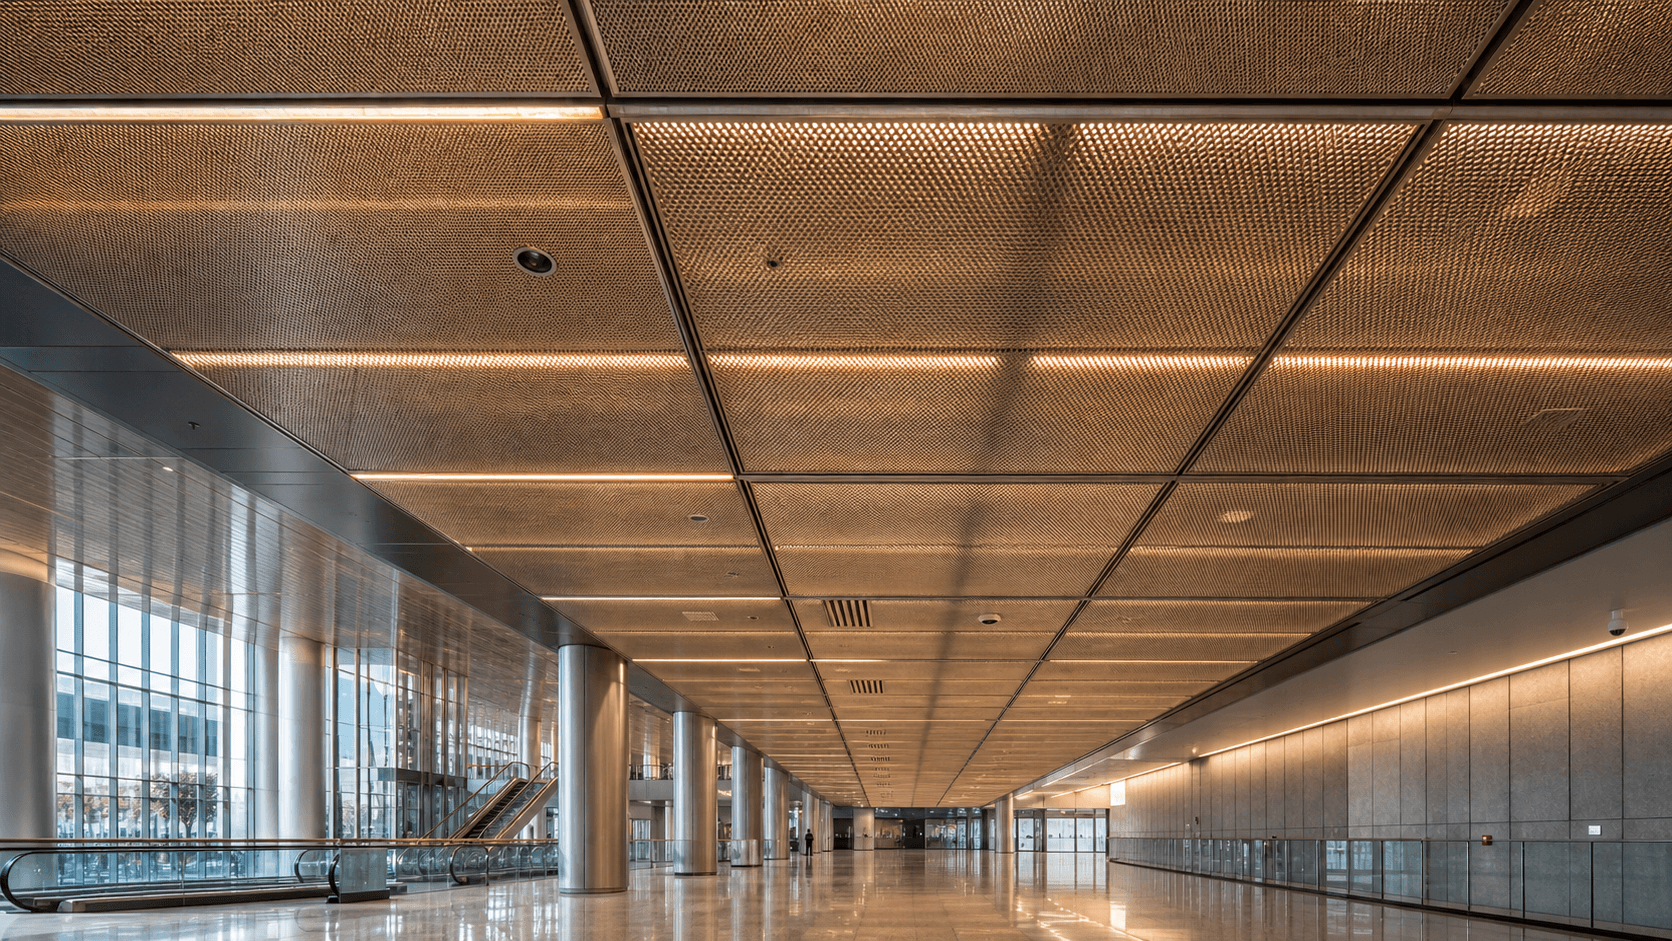
Specification and coordination guidance for contractors, EPC teams and buyers planning high-traffic public-space mesh ceilings.
Introduction
Short answer: an architectural stainless steel mesh ceiling is successful when the mesh pattern, framed-panel size, suspension system, lighting, services and maintenance access are coordinated as one ceiling assembly. The mesh is highly visible, but it cannot be specified independently from the structure that holds it.
Transit stations, libraries, museums, hospitality lobbies and civic halls use metal mesh to create depth, reflect light and maintain visual access to services above. For contractors and EPC teams, the challenge is practical: the material must arrive in manageable modules, align with the grid, survive handling and allow access after handover.
This guide explains how to prepare a stainless steel architectural-mesh ceiling package for public projects. It is written for purchasing and coordination. Local fire, seismic, acoustic, access and building requirements remain the responsibility of the project design team and relevant authorities.
What makes mesh ceilings suitable for public interiors?
Woven or expanded metal mesh can provide a distinctive ceiling plane without fully closing the plenum. Depending on pattern, wire/profile, open area, finish and backing, it can soften a large space, mask services from normal viewing angles and work with dramatic linear lighting.
The value is not only decorative. A modular framed system can make selected zones removable for maintenance when designed that way. However, mesh is not automatically acoustic, fire-rated or load-bearing. If the project needs those functions, they must be designed into the wider ceiling assembly.
Begin with the visual and operational brief
Before choosing an opening pattern, confirm what the ceiling needs to achieve.
- Is the goal a bright reflective ceiling, a darker technical ceiling or a feature zone?
- Will passengers or visitors view it from directly below, at long distance or from escalators?
- What lighting is above or below the mesh, and how will glare be controlled?
- Must sprinklers, speakers, cameras, signs and HVAC remain visible or be screened?
- Which areas need regular access for maintenance?
- Are there curved zones, bulkheads, expansion joints or transitions to other ceilings?
In early coordination meetings, one of the most useful outputs is a reflected ceiling plan that divides the area into panel zones and identifies every service coordination point. A beautiful full-width rendering cannot tell an installer where the last panel should end.
Select the mesh pattern for scale, transparency and handling
Mesh is described through its material, wire/profile, opening geometry, pitch, open area, weight and finish. Different patterns can appear dense or open depending on viewing angle and lighting. A small sample held flat on a desk is not enough for a station concourse or tall lobby.
Woven stainless steel mesh
Woven mesh can offer a refined, textile-like surface and a sophisticated play of light. It may be supplied as panels, framed inserts or tensioned elements depending on the product and project. The frame design and tensioning approach are as important as the mesh itself; loose mesh can appear uneven under strong side lighting.
Expanded or perforated metal alternatives
Expanded mesh and perforated panels create a more graphic, repeatable pattern. They can be practical where a rigid sheet format is preferred. The selection should consider cut-edge treatment, panel flatness, orientation and how the pattern terminates at corners and service openings.
Use a full-size mock-up
For a premium public project, approve a representative mock-up that includes mesh, frame, suspension, lighting and a service opening. View it at the expected height and lighting level. This is where the project team can agree on shadow, reflectance, joint lines and perceived openness before the factory produces hundreds of panels.
Frame and suspension: the concealed engineering behind the finish
Mesh needs a stable perimeter. A framed panel typically includes a metal frame, mesh attachment method, corner treatment, suspension interface and, where required, safety retention. The support arrangement may use a grid, carriers, hangers, threaded rods or project-specific brackets.
Define the module size strategically
Very large panels reduce joint lines but can be harder to ship, lift and remove around services. Smaller panels improve access and replacement but create more visible grid. The appropriate module size depends on ceiling height, mesh stiffness, plenum constraints, access requirements and site lifting conditions.
Set module sizes around major services rather than forcing every sprinkler or light through a mesh panel. A controlled perimeter panel or dedicated service module often gives a cleaner final result.
Make access intentional
For metro, library and museum projects, the ceiling often hides equipment that must be serviced. Decide which panels are fixed, hinged or demountable. Confirm the release direction, retained hardware, opening clearance and safe working procedure. A removable panel that cannot clear a nearby duct is not a maintenance solution.
Stainless steel, finishes and public-space durability
The stainless grade and finish should reflect the environment, cleaning method and visual goal. Brushed stainless can reduce the visibility of fingerprints compared with a high-polish surface. Dark-coated or PVD-look finishes may suit dramatic interiors, but the finish system, touch-up process and batch consistency should be agreed in writing.
For stainless mesh and frames, clarify:
- Material grade and finish sample.
- Mesh orientation and visible side.
- Frame material, corner joining and weld/edge finishing.
- Fixing material and isolation from dissimilar metals.
- Permitted cleaning products and frequency.
- Protective film, separators and handling gloves during installation.
At shipment inspection, check sample panels under normal light, not only factory lighting. Review frame squareness, mesh tension, pattern direction, sharp-edge control, labels, accessory count and crate layout.
Integrate lighting, MEP and life-safety systems
Public ceilings are coordination-heavy. Lighting can make mesh appear luxurious, but it can also reveal uneven framing or create unwanted glare. Linear lights above the mesh often create a soft luminous field; directional downlights may need careful aiming to prevent distracting sparkle.
Lighting coordination
- Prepare a lighting mock-up using the selected mesh and finish.
- Confirm whether light fixtures sit above, below or flush with the mesh plane.
- Control panel joints near continuous light lines.
- Avoid placing exposed drivers or untidy cables where they become visually prominent.
Services coordination
Sprinklers, emergency lights, detectors, speakers, cameras, signs and HVAC need locations and service access agreed early. Do not rely on cutting mesh at site for each service penetration. Use designed openings, collars, framed inserts or adjacent access modules as approved by the project team.
Factory production and quality-control workflow
A reliable public-project package follows a documented sequence:
- Approve reflected ceiling plans, elevations, sections and panel numbering.
- Approve material, finish and full-size mock-up where required.
- Freeze module sizes and accessory interfaces before nesting/cutting.
- Produce a first article or sample bay for review.
- Fabricate, label and protect panels by zone.
- Conduct factory inspection against drawings and packing list.
- Pack crates in installation sequence with clear zone labels.
Factory testing should be proportionate to the product. It can include trial assembly of a representative bay, checking panel fit to the carrier/grid, confirming demountable access operation and verifying retained fasteners. If the project requires specific load, fire, seismic or other certification, define the test basis and responsibilities separately; it should not be implied by routine factory checks.
Procurement checklist for EPC teams and contractors
For a quotation that can be reviewed quickly, provide a reflected ceiling plan, key sections, approximate panel areas, ceiling height, service zones, desired mesh appearance and delivery location. Identify requirements for mock-ups, design submittals, shop drawings, inspection points, documentation language and third-party witnessing.
Ask the supplier to separate mesh type and visible finish; panel frame and attachment method; carrier/grid, hangers and perimeter trims; access-panel hardware; lighting/service interface assumptions; numbering and packing; and stated exclusions. This makes it easier to distinguish a material-only offer from a coordinated ceiling package and shows where local support steel, electrical work, fire-system coordination or labour sits in the scope.
Designing for maintainability after handover
Public-space ceilings are installed once but serviced many times. The handover plan should identify safe access routes, removable-panel locations, replacement-panel records and cleaning methods. Mesh collects dust differently from a sealed ceiling, especially near transport entrances and air outlets. Specify access that does not require workers to bend frames or climb on unapproved areas.
For premium finishes, retain a panel schedule, finish sample, cleaning guidance and approved replacement process. A controlled number of spare panels from the original production lot can assist later repairs, because a new batch may differ subtly in sheen, coating or mesh tension.
Example: an illuminated metro concourse
Consider a large metro concourse using dark stainless woven mesh above a wide circulation zone. The design intent is a continuous ceiling with warm linear light reflected through the pattern. A practical response may be a regular grid of framed panels, dedicated modules around speakers and sprinklers, and limited hinged access panels at equipment locations. A full-size mock-up checks whether the mesh reads as a calm plane or exposes the services above.
Before shipment, the factory trial-assembles a representative group to verify frame dimensions, carrier fit and pattern direction. Crates are labelled by ceiling zone and installation sequence. On site, the contractor installs and approves one completed area before proceeding. That workflow does not remove normal coordination, but it makes the visual result repeatable across a complex public interior.
Installation preparation for contractors
Before delivery
Confirm that the overhead structure and suspension points are released, the plenum is ready, major MEP work above the ceiling is sufficiently complete and access equipment is available. Verify storage conditions: panels should remain dry, protected from impact and separated to avoid finish abrasion.
Installation sequence
- Set out datum lines, levels and control points from the approved reflected ceiling plan.
- Install primary suspension and verify line, level and connection quality.
- Install carrier/grid elements and confirm module dimensions before opening crates.
- Fit a sample zone, including lighting and a service opening, for sign-off.
- Install framed mesh panels in the marked sequence, using clean gloves and protected tools.
- Check alignment, pattern direction, joint consistency and access-panel operation.
- Complete final cleaning and handover documentation.
Keep a small quantity of labelled spare panels and accessories when the project programme and budget allow. This helps with future repairs or alterations without relying on a new production batch to match the installed finish.
Common problems and how to avoid them
Pattern direction changes across panels
Mark orientation on drawings, frames, cartons and crates. A pattern that looks symmetrical in a sample may have a clear directional effect on a full ceiling.
Insufficient clearance for service access
Coordinate ducts, cable trays and fixture locations before locking panel sizes. Test one access panel physically in the mock-up or first installed bay.
Late lighting changes
Changing fixture type late can alter glare, shadow and the visibility of the plenum. Keep lighting design tied to the approved mesh mock-up.
Site cutting damages finishes
Where penetrations are unavoidable, use an approved detail and controlled fabrication process. Unplanned cutting can leave sharp edges, distort the mesh or damage a coated finish.
FAQ
Are stainless steel mesh ceilings suitable for metro stations?
They can be suitable when the ceiling system is coordinated with the public-space environment, maintenance access, lighting, services and relevant local requirements. The mesh alone is not a complete ceiling solution.
Can mesh ceiling panels be removed for maintenance?
Yes, if the frame and suspension are designed as removable or hinged modules and the plenum has sufficient clearance. Define this requirement before production.
Does metal mesh improve acoustics?
Mesh by itself is not an acoustic specification. Acoustic performance may depend on backing, absorbent material, plenum design and the tested ceiling assembly.
What information is needed for a quotation?
Provide reflected ceiling plans, sections, project location, approximate area, mesh/finish preference, module size target, ceiling height, service requirements and delivery schedule.
Conclusion
Architectural stainless steel mesh ceilings can give a transit or civic project a durable, high-impact identity without losing access to the building services above. The key is coordination: choose the pattern at real scale, design the frame and suspension as a system, lock panel zones before production and use mock-ups plus shipment inspection to protect the intended result.
CTA: Discuss your public-project ceiling package
Send HOOPROSP your reflected ceiling plan, project location, target area and finish reference. We can help you prepare a mesh-panel concept, accessories list, sample/inspection plan and export packing proposal for contractor review.
CTA: Ask for a Mesh Ceiling Proposal → `/inquiry`